Get ready
Gather these before turning the Mac off.
Boot the USB and test internet
Do this in the live session before opening the installer.
MacBook Air → Broadcom Wi-Fi driver → working connection
EndeavourOS offered to install the Wi-Fi driver in the live session. Accepting it made the internal Wi-Fi work on this Mac. Keep a backup network route in case the prompt fails.
- Start the Mac while holding Option (⌥). Choose the USB’s EFI entry.
- If EndeavourOS offers to install Wi-Fi drivers, accept the prompt.
- Open a browser in the live session and load a webpage.
Install EndeavourOS
Use GNOME as the desktop. This setup keeps GNOME as the configured session.
The simple disk setup
Choose the automatic Erase disk option and enable Encrypt System. The installer creates the boot and system partitions for you. The small boot partition stays readable by Mac firmware; your installed Linux system is encrypted.
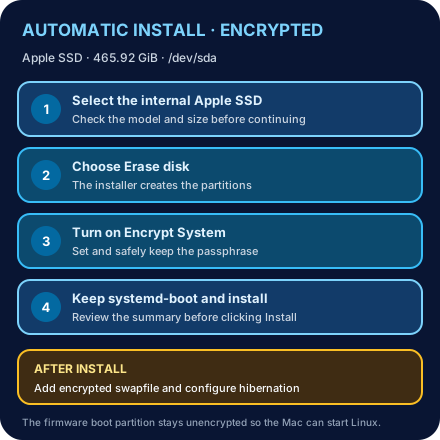
If you see Create, Edit, Delete, or Volume Group buttons
That is Manual partitioning. Go back and choose Erase disk for the Apple SSD instead. You do not need to create partitions or a volume group.
Other installer choices
- Bootloader: Keep EndeavourOS’s default systemd-boot.
- Kernel: Keep the regular
linuxkernel and add the LTS kernel as a fallback. - Printing: Select general Printing support (CUPS) for office printers.
- Packages: Keep Desktop-Base + Common packages and recommended defaults selected; leave GNOME’s EndeavourOS settings enabled and keep Firefox selected temporarily so the guide is available on first boot. Chrome installs early; setup asks about removing Firefox at the end.
GNOME uses Wayland. XWayland lets older X11 apps run inside that desktop.
MrDemonWolf, Inc. branding: ./setup.sh all copies the supplied logo into ~/Pictures, sets your account photo, and installs a separate Plymouth startup theme. The apps step installs EndeavourOS’s systemd-boot helper so the setup can rebuild the encrypted boot images. GDM stays enabled for GNOME. The custom logo should appear with the encryption passphrase prompt. systemd-boot’s menu stays text-only, and the Mac firmware picker is unchanged.
This setup keeps GDM enabled so GNOME stays the desktop. Sign in to GNOME before running the full setup.
Copy, paste, and run setup
Use Ghostty or another terminal. Run commands as your normal account, not root.
Wi-Fi works from the live USB, but the installed system needs its own driver. ./setup.sh apps installs Arch's broadcom-wl-dkms package for this Mac's Broadcom card. It also installs headers for the regular and LTS kernels so the Wi-Fi and camera drivers can build for either one. Keep another way to get online available until setup finishes. After reboot, check that Wi-Fi still works.
If Git is missing
sudo pacman -Syu --needed gitDownload the setup repo
mkdir -p ~/Developer
cd ~/Developer
git clone https://github.com/nathanialhenniges/linux-setup.git
cd linux-setup
Install Ansible, then check readiness
./setup.sh bootstrap
./setup.sh status
Bootstrap installs Ansible and its pinned pacman support collection. If a command fails, stop and read the message.
Target check: Setup pauses if the OS or Mac model is missing or does not match this laptop. Check the detected values, then type CONTINUE only if you understand the difference. Without an interactive prompt, use --accept-target-warning to acknowledge it. The x86-64, pacman, non-root, and SSH checks still apply.
Install Chrome so this guide is easy to follow
./setup.sh --dry-run chrome
./setup.sh chrome
google-chrome-stable 'https://linux-setup.mrdemonwolf.dev/' >/dev/null 2>&1 &
This installs Chrome before the rest of setup, then opens this guide in Chrome without holding up the terminal. Review the yay prompt. Firefox remains available until the final cleanup question.
Preview the full plan
./setup.sh --dry-run allRead the plan before continuing. Dry run makes no changes and does not use sudo or the network.
Install the official ChatGPT app
./setup.sh --dry-run chatgpt-app
./setup.sh chatgpt-app
This installs ChatGPT from OpenAI’s signed Arch repository. The installer asks before a full system upgrade. The all and apps actions include ChatGPT.
Clean up old setup items
./setup.sh --dry-run cleanup-legacy
./setup.sh cleanup-legacy
Open a GNOME terminal to run this. It clears the old ChatGPT Chrome launcher and dock pin, then offers to remove any known Hyprland packages it finds. Pacman shows the removal list for a separate approval. Personal Hyprland settings remain. The all action performs this cleanup too.
Keep Ghostty as the one terminal
./setup.sh --dry-run cleanup-terminals
./setup.sh cleanup-terminals
This checks a short, reviewed list of extra terminal apps. It asks before offering any found apps to Pacman, which shows its own package and dependency removal list. Ghostty and command-line tools stay installed. The all action includes this cleanup.
Remove the old Hyprland session
./setup.sh --dry-run remove-hyprland
./setup.sh remove-hyprland
Run this from the desktop you are using now, after saving open work. It turns on GNOME’s sign-in screen, then shows the packages and unused dependencies pacman plans to remove. Pacman waits for your approval. Reboot when it finishes and choose GNOME. Your personal configuration files stay in place.
Run the setup
./setup.sh allStart in GNOME and review every AUR build prompt; setup will not approve one for you. Chrome, VS Code, Dash to Dock, Oh My Posh, and the FaceTime HD camera support come from the AUR. The official Arch repositories provide the CaskaydiaCove Nerd Font configured in Ghostty. ChatGPT comes from OpenAI’s signed Arch repository, whose installer asks before a full system upgrade. Setup clears the old ChatGPT shortcut, offers to remove known Hyprland packages, and asks before removing extra terminal apps. Ghostty stays as your terminal. Setup queues AppIndicator and Dash to Dock for your next GNOME login; the reboot below loads them. After reboot, use the camera check below, then test the actual picture in Chrome. If setup pauses on the target warning, compare the shown OS and model before entering CONTINUE. Use --accept-target-warning only when running without an interactive prompt.
Restore the familiar GNOME login
./setup.sh --dry-run display-manager
./setup.sh display-manager
reboot
This turns off SDDM and makes GNOME’s GDM the login screen after reboot. At the sign-in screen, choose GNOME. You do not need to reinstall Linux.
Give GNOME a familiar Mac feel
./setup.sh --dry-run gnome-dock
./setup.sh gnome-dock
Your app lineup sits on a warm, translucent dock along the bottom, with GNOME’s top bar still in place: Files, Chrome, Telegram, Discord, Notion, the official ChatGPT app, Music, VS Code, and Ghostty. Trash stays pinned, too. Plex, Upscayl, and LibrePods remain in the app grid rather than the dock. LibrePods starts minimized after login. The dock action saves AppIndicator tray support and Dash to Dock for your next GNOME login; log out and back in, or reboot, to load them. Pair AirPods manually. This pinned version has a reported GNOME/Wayland connection issue; if it exits while connecting, open it from the app grid after login. GNOME uses its built-in dark appearance and left-side window buttons, while the MrDemonWolf wallpaper stays in place. Apple Messages and Reminders do not have native Linux apps in this setup.
Shortcuts · Command key = Super
- ⌘ + Space
- App grid
- ⌘ + Return
- Terminal
- ⌘ + E
- Files
- ⌘ + Q
- Close window
- ⌘ + F
- Fullscreen
- ⌘ + L
- Lock screen
- ⌘ + 1–4
- Switch workspace
- ⌘ + Shift + 1–4
- Move window to workspace
- Ctrl + ⌘ + Space
- Switch keyboard layout
- Print Screen
- Screenshot
- ⌘ + Shift + S
- Screenshot options
⌘ + A also opens the app grid. Brightness and media keys keep their normal GNOME behavior. For the remote Mac, use Chrome Remote Desktop’s full-screen keyboard controls; this setup adds no separate shortcut-passthrough mode.
Replace the Arch boot logo
./setup.sh --dry-run branding
./setup.sh branding
reboot
This selects the MrDemonWolf Plymouth theme and rebuilds the installed boot images. The startup logo changes on the next boot; the text-only systemd-boot menu stays the same.
Set your account photo
./setup.sh --dry-run profile-picture
./setup.sh profile-picture
This changes only your account photo. Run ./setup.sh apps once first if AccountsService is missing.
Remove Firefox
./setup.sh --dry-run purge-firefox
./setup.sh purge-firefox
At the end of ./setup.sh all, you will be asked whether to remove Firefox and its local profiles, saved logins, bookmarks, cookies, settings, and cache. Chrome installs first. Answer yes to remove Firefox; Google Chrome and its profile are left alone. Close Firefox before confirming. If you skip the prompt, use these commands later to review and retry.
Then reboot:
rebootFirst login and quick checks
At GDM, choose GNOME. The dock will hold the MacBook Air apps installed by this setup.
Verify the laptop setup
cd ~/Developer/linux-setup
./setup.sh verify
Check the built-in camera
cd ~/Developer/linux-setup
./setup.sh camera
Setup builds the FaceTime HD driver and installs its firmware. After reboot, ./setup.sh camera checks the packages, driver build, and video device. Then open Chrome to meet.google.com, allow camera access, and see whether your picture appears in the preview.
Connect to your Mac with Chrome Remote Desktop
This laptop is the client. It does not install a Chrome Remote Desktop host.
This MacBook Air is the client. Chrome Remote Desktop controls how shortcuts reach the remote Mac, so test the Command-key combinations you need in a safe text field.
If you only remember three things
- 1. Test internet in the live USB before erasing the disk.
- 2. Read the dry-run plan before running the full setup.
- 3. Test Mac Command shortcuts in a real Chrome Remote Desktop session.